In the series of Shopify checkout customization, we’ve learned about 24 tactics to make sure customers get the best experience. But that's definitely not everything about checkout, not when it comes to one-page checkout.
Thus, in this part, we’ll dive deep into 5 expert tips to optimize one-page checkout for the Shopify store and recommend some useful apps and tools to streamline this process.
1. Implement upselling and cross-selling
Once customers reach the checkout page, they’re more willing to buy than ever.
Thus, checkout pages offer golden opportunities to increase revenue by implementing effective upselling and cross-selling strategies.
These techniques offer customers the chance to upgrade to higher-priced versions of their chosen product or to add complementary items to their cart.
How to do it?
For Shopify Plus users

Shopify Plus offers a more direct way to implement upselling and cross-selling right on the checkout page. You can make use of apps specifically designed for the checkout page, and here are some recommendations for you:
- AfterShip Personalization (5.0/5.0 - 58 reviews): This app can provide many upselling and cross-selling tools like product recommendations, free shipping, and discounts on the checkout page. These features can also be created based on customer behavior, products, and orders.
- UpsellPlus (5.0/5.0 - 54 reviews): You can recommend related products at discount prices at the checkout page to encourage customers to buy more.
For Non-Plus users
Unfortunately, you can’t yet customize your checkout page directly to upsell and cross-sell products if you're not on Shopify Plus.
However, you can still effectively implement upselling and cross-selling tactics in both the pre-purchase and post-purchase stages. Here's how you can do it:
- Pre-purchase stage: You can suggest related or complementary products or upgrades in the shopping cart before customers checkout. There are many upsell apps on the Shopify App Store that can help you apply these tactics. Simply find the upsell and cross-sell keywords and choose the suitable apps.
Pro Tip: FoxKit can encourage customers to buy more and head to the checkout page faster with powerful upsells like In-cart Recommendations, cross-sells like Bundle Discount, and sales-boosting features like Freeshipping Goal. Especially, FoxKit offers advanced Analytics for these features so you can find out the best method to upsell and cross-sell before the checkout process. 
- Post-purchase stage: After customers have completed their purchase, you can utilize post-purchase pages like order confirmation pages, thank-you pages, or email marketing to present upsell and cross-sell opportunities. For instance, you can recommend additional products that complement the one they've just bought. You can refer to this review to choose your app.
2. Minimize and simplify form fields
As in one-page checkout, every element in the previous 3 checkout pages is merged and displayed on one page. Customers may feel frustrated when they must roll down a long way and fill out multiple forms to complete their orders.
Thus, it is necessary to reduce the number of form fields required for customers to complete their purchases. It can help speed up the checkout process and avoid an unnecessarily long and complex checkout page.
How to do it?
Evaluate checkout page settings
Start by considering which form fields are crucial for your store's needs. Typically, the most essential information includes the customer's name, contact details, payment information, and shipping address.
To remove redundant fields from your checkout page, go to Shopify Dashboard > Settings > Checkout. Here you may find fields like "First name", "Company name", "Address line 2", and “Shipping address phone number” can be eliminated from your checkout page without sacrificing essential data.

Provide address match option
More often than not, a customer's shipping and billing addresses are the same. To simplify the checkout process further, give your customers the option to check a box indicating that their billing and shipping addresses match. This small but effective checkbox can significantly reduce the length of the checkout page and the time and effort required to complete the checkout.
You can easily set this feature up by ticking the checkbox below in your Checkout Settings.

3. Leverage brand awareness on the checkout page
In the world of eCommerce, every touchpoint with your customers represents an opportunity to strengthen your brand identity and create a lasting connection. Your checkout page, despite being the final step in the purchase journey, is no exception. It's a valuable canvas where you can infuse your brand's personality, making the shopping experience efficient and memorable.
How to do it?
The design elements you choose for your checkout page can speak volumes about your brand. Ensure that the colors, fonts, logos, favicons, and images used on the checkout page align with the overall brand experience of your website.
You can design these elements easily in the theme editor. For example, you can change the background image, logo, background color, and typography for each section of your checkout page in the Minimog theme editor.

While adding an array of colors and elements to the checkout page is tempting, it's best to maintain a clean and simple design. Remember: customers primarily use these pages to input crucial shipping and payment information. An overly cluttered design can lead to distractions and hinder readability. So you should opt for colors with high contrast and images that complement, rather than overpower, the text on the page.
To learn how to customize the style of your checkout step by step, you can read the detailed guidance of Shopify here.
4. Incorporate trust signals
Trust is the cornerstone of successful customer relationships. Your buyers need to feel secure and confident when making their purchases on your website. A recent survey by PYMNTS found that 92% of customers were extremely satisfied with checkout experiences that prominently displayed trust marks. Thus, as a Shopify merchant, it's crucial to incorporate trust-building elements into your one-page checkout process.
But what exactly are these trust marks?
- Security badges: Security badges like SSL certificates and recognized payment icons send a strong message of security and trustworthiness.

- Money-back guarantees: Offering a money-back guarantee is a powerful way to build customer confidence and trust. It shows that you stand by the quality of your products or services and are willing to make it right if the customer is dissatisfied
- Social proof: In the form of star ratings and client reviews, social proof can work wonders in instilling confidence in the products or services customers are about to purchase. These ratings and reviews provide insights into previous buyers' experiences, making the decision-making process easier for shoppers.
How to do it?
To include trust signals in your Shopify stores, you can utilize Shopify review apps, which can be found easily on Shopify App Store. Shopify offers a range of review apps like Judge.me, or Loox to collect and display reviews on the checkout page. To explore more apps for social proof and trust marks, you can refer to this review.
However, please note that if you aren’t a Shopify Plus user, you can hardly incorporate these trust signals into your checkout page.
5. Add multiple payment methods
Online shoppers have diverse payment preferences, and providing a range of payment methods on your Shopify one-page chẹcout can be the key to satisfying a broader customer base. Research shows that 42% of US consumers would abandon a purchase if their preferred payment options weren't available.
Thus, to ensure a seamless and inclusive shopping experience, you should consider offering a variety of payment choices like credit and debit cards, mobile payment solutions (PayPal, Shop Pay, or Apple Pay), digital wallets, and buy now, pay later options.
How to do it?
Add Netbanking/ Debit Card/Credit Card/UPI
Shopify Payment supports most payment choices like UPI, debit card, credit card, and net banking. To enable third-party payment providers (Cashfree, Stripe, PayPal), you just need to:
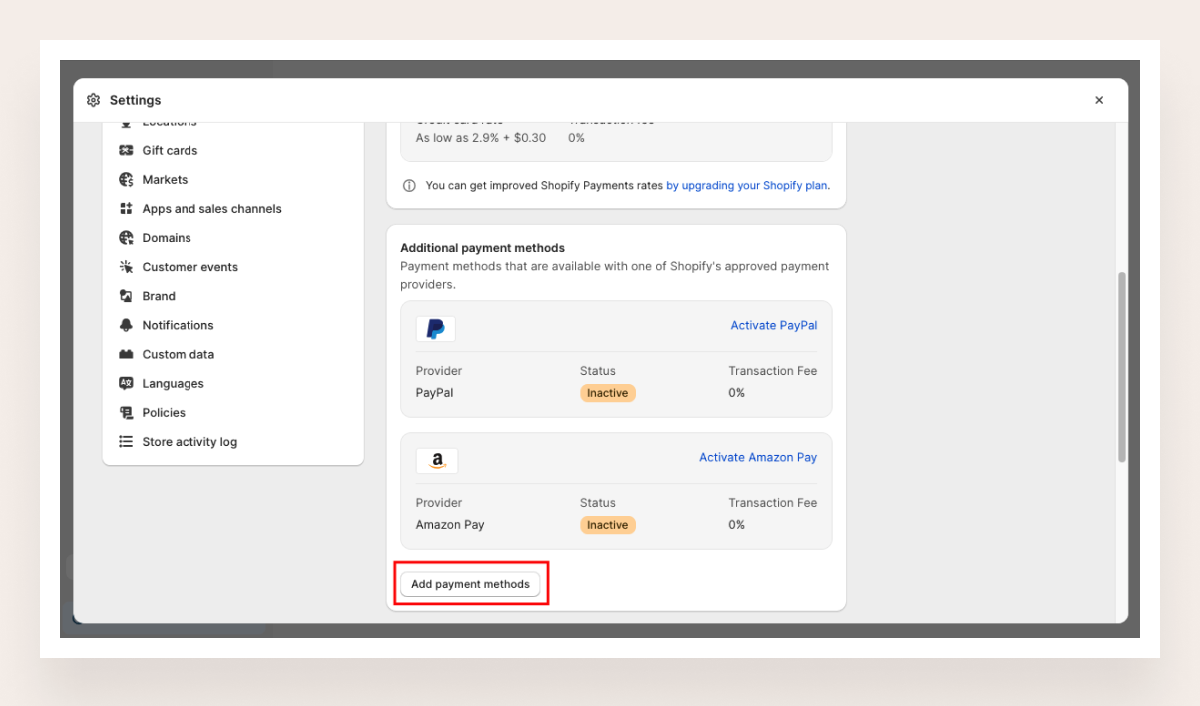
- Go to Settings > Payments
- Head over to Add Payment Method
- Here you can search by Payment methods or Search by provider
- Select the provider/payment method that you want to use from the list
- Connect your account with this provider
- Click Activate
 Allow Cash on delivery
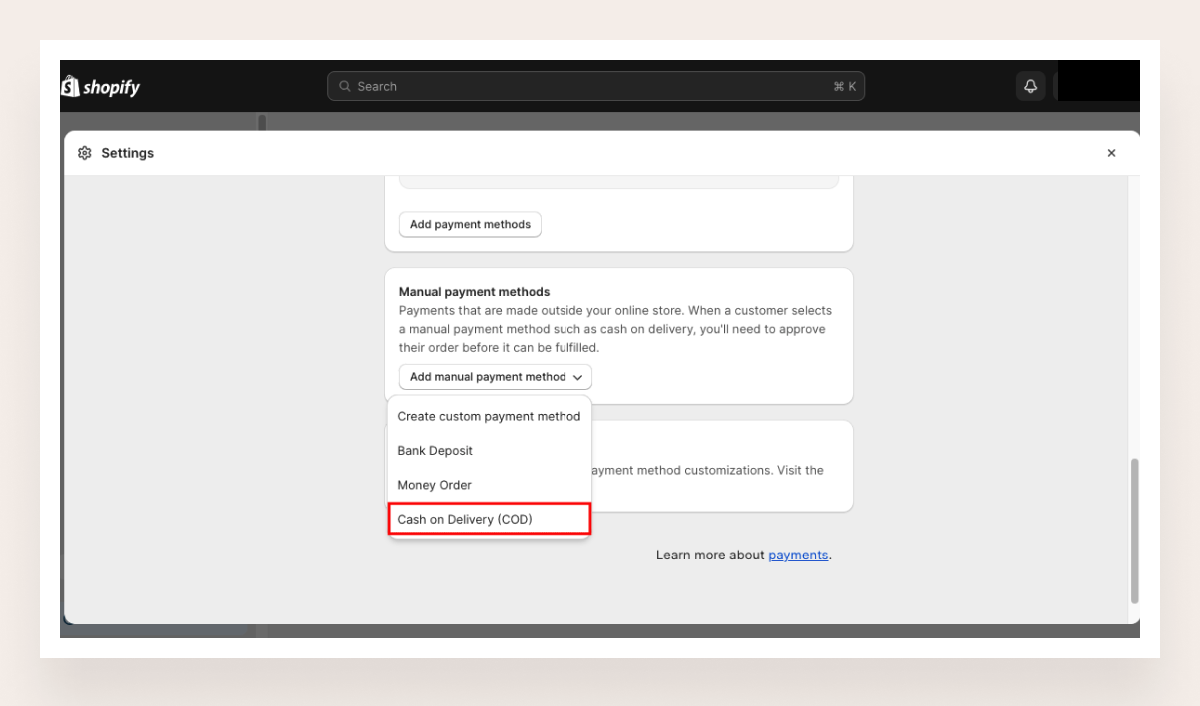
To allow your customer to pay on delivery, you can follow these steps
- Go to Settings > Payments
- Choose the Manual Cash On Delivery option from the Payment Providers section
- Enter the Payment Instructions for the customers to follow when making a payment
- Click Activate
Activate Buy now, Pay later
Buy Now Pay Later (BNPL) payment is on the rise. It’s essential to add this payment method to your store this BFCM. To enable customers to use the buy now, pay later (BNPL) option, consider integrating Shop Pay Installment by Shopify.
You can find and install Shop Pay Installment from the Shopify App Store with this guideline. This integration can enhance the shopping experience on your eCommerce platform by providing flexibility in payment choices.
This app is currently the top 1 BNPL app for Shopify. However, to use this app, your store needs to be based in the United States, sell in USD, and have both Shopify Payments and Shop Pay activated. Thus, if you want an alternative, refer to this review on other BNPL apps.
Are you ready to switch to the one-page checkout?
Your Shopify one-page checkout offers many benefits for both your store and customers, although there's no one-size-fits-all approach.
Thus, you can still tailor your one-page checkout to align with your unique business needs and customer preferences. This article can equip you with expert tips to make and optimize your one-page checkout experience to increase customer experience and AOV.
We highly recommend the ultimate Shopify combo - Minimog theme x FoxKit app if you need a helpful tool to streamline the optimization process. The feature-rich and easy-to-use theme will upgrade branding on your Shopify one-page checkout, while the powerful upselling and cross-selling features of FoxKit will rush your customers to the checkout page.
Get Minimog x FoxKit free trial now!